I mentioned ‘tipi’ with an air of seriousness, and the discussion wobbled clumsily off of the Airstream. (You can read more about why a yurt.) From viewing the enticing collection of nomadic structures at Colorado Yurt Co., to drawing out a footprint 20′ in diameter in our Florida front yard, our plans for long-term temporary shelter at Sahalee came full circle with Groovy Yurts.
As John Conlee reveals, rose-colored glasses show only the beauty…
My rose-colored glasses save me day after day, backed by psychological research reinforcing the therapeutic effects of viewing life through lenses tinted with Baker-Miller pink.
Beyond vivid UV lenses, the other requirement I have for my sunglasses is that they have to be constructed of a no-frills lightweight solid frame with an inset or molded nosepad. This design has fewer entrapment points to catch and pull my hair, and make the gear easy to wear and store while living an active lifestyle.
BONUS: Made in the USA!!
After going through one incredibly stellar designer pair made in China that caught me in a retail therapy splurge when I had a lot of money to spend, then a well-functioning no-name sport design from China for $40 on special at a race expo, and finally desperately seeking a made in the USA option that was less expensive than these “unstoppable” Oakley’s, I was incredibly pleased to stumble upon the Suncloud Duet Rose Stripe sunglasses for UNDER $30!They are super lightweight with stable hinges and a comfortable fit around the ear. The lenses are happily clear and polarized, helping to better define the horizon and distant figures in an expansive landscape. The pink lens is bright but not too disruptive. A subtle wood-grain design akin to tiger stripe adds a little flair to the translucent rosy frame. Along with the glasses came a satiny storage pouch in the same color with a smooth black flat ribbon cinch, all delivered inside the minimal clear plastic zipper bag packaging.
I’ve been lucky enough to take them out in a variety of conditions in places near and far, and I am completely smitten with my new specs. When I wear them, I feel like I know a secret about life that only those in the rose-colored club can truly understand. I still might follow my urge to buy just one more pair as a back-up before I can’t find them anymore!!Adding just a little bit of color to life…
We hope that 2017 was a great year for you and we hope that 2018 is even better.
Unfortunately, we have had some shifting priorities and this blog fell to the bottom of a long list for the past few months. For that I apologize and am committed to doing better in this new year. If you are not following our blog, give us a follow. We don’t (and will never) spam and we try to provide useful information with regards to things we are doing, some of them work and some of them are truly disastrous, but we have been and will continue to be as completely open and honest as possible. In full disclosure, we have built relationships with some of the companies that sell the products we use and are Amazon affiliates–so the more links you click and the more things you buy from this blog the more money we will make and the more time we will have for spending time with this. All this being said, we are not in it to make money–we are in it to share our experiences and let you know what works, and more importantly, what doesn’t work for us. We will NEVER recommend something we do not have first hand experience with!
Today I want to talk about what we use for water filtration—It’s important to note that all of our water comes from “trusted sources,” our current sources are a city spigot and water catchment. We aren’t using standing or stagnant water, we also aren’t taking any water out of streams so we don’t have to deal with the potential contaminated water issues that come with those.
We researched many ways, some cheap and some expensive, some intricate and some simple. I’m a big fan of the KISS method, so I went with the cheap(er) and simpler way. For us, that was using Ceramic Dome filters and two (food grade) five gallon buckets. We started with a kit similar to this that included a Dome filter and a spigot. We used these food grade buckets, now I don’t know what the difference is between food grade and non-food grade but, in my mind, some things just aren’t worth questioning and this was one.
We started with two ceramic filters, I have a link above for the kit that included the spigot and here is one that goes to the individual ceramic filters.
Lesson learned with regards to Ceramic Water Filters: Make sure to get the ones that have a “pre-filter” or “sock” to cover them–we made the mistake of buying one without the pre-filter and immediately regretted it. The pre-filter really helps to keep the actual filter clean and helps to lengthen the time in between cleaning the filters. A quick fix for us when we realized that we really needed that sock was just to use some ground or garden cloth to fashion a sock that fit over it and used rubber bands to hold it on.
We bought two food grade buckets, with lids. The first step was to install the filters in the bucket.
The Ceramic Filters have a shaft that extends down an inch or two with a nut and washer that you can use to secure it—all we had to do was drill a hole the size of the shaft, we did start with a pilot hole. The hole went through the bottom of what would be the top bucket and through the lid of what would be the bottom bucket. So now the two filters are locking the top bucket and the lid for the bottom bucket together.
Alternative configurations: We decided to just use two ceramic dome filters, however with the buckets that we used we could have used anywhere from 1-4 filters. The more filters you use the faster your water will filter and the more water you can filter before having to replace your filters. When it is time to replace the filters we have we will go to the four filter configuration.
Once that was done, it was as easy as drilling a hole in the lower section of what would be the bottom bucket and fitting the spigot in.
Spigot tip: We recommend installing the spigot a couple inches (give or take) from the bottom of the bottom bucket. This will give any debris or sediment that may get in the water a chance to settle to the bottom.
We clean the whole system–just washing the buckets and using a green scrubby on the filters ever month or so—it is readily apparent to us when they need to be cleaned–depending on the amount of water you are filtering and the cleanliness of water you are filtering you may need to clean it more or less. The filtration rate certainly slows down when the filters get dirty which is an indicator that you need to clean your filters.
In short, this system works great for us. There are two “what I could’ve done better” lessons for me on this one. 1. I should have just invested in the extra filters and set it up as a 4 filter system. 2. I should have bought a filter that came with a sock or pre-filter for our second ceramic filter. As soon as it is time to change the two filters out I will be rectifying both of those deficiencies.
Take a look at the slide show we made, let us know your thoughts in the comments–if you have any questions or tips or better ideas, please let us know. We are always looking for ways to help but are also always looking for better ways.
Carey and I had to take a trip to town for some groceries, the laundry and to take the dog to the vet (don’t worry, she is fine!). We decided to stay the night and since we did we figured it would be great to go get some dinner. We have stopped at Turtle Mountain Brewery in Rio Rancho a few times, they have a great patio for Radar, great beer and we always get in great conversations with the patio people. Check them out on FB here and while your there make sure you check out Sahaleeoffgrid on FB also!!
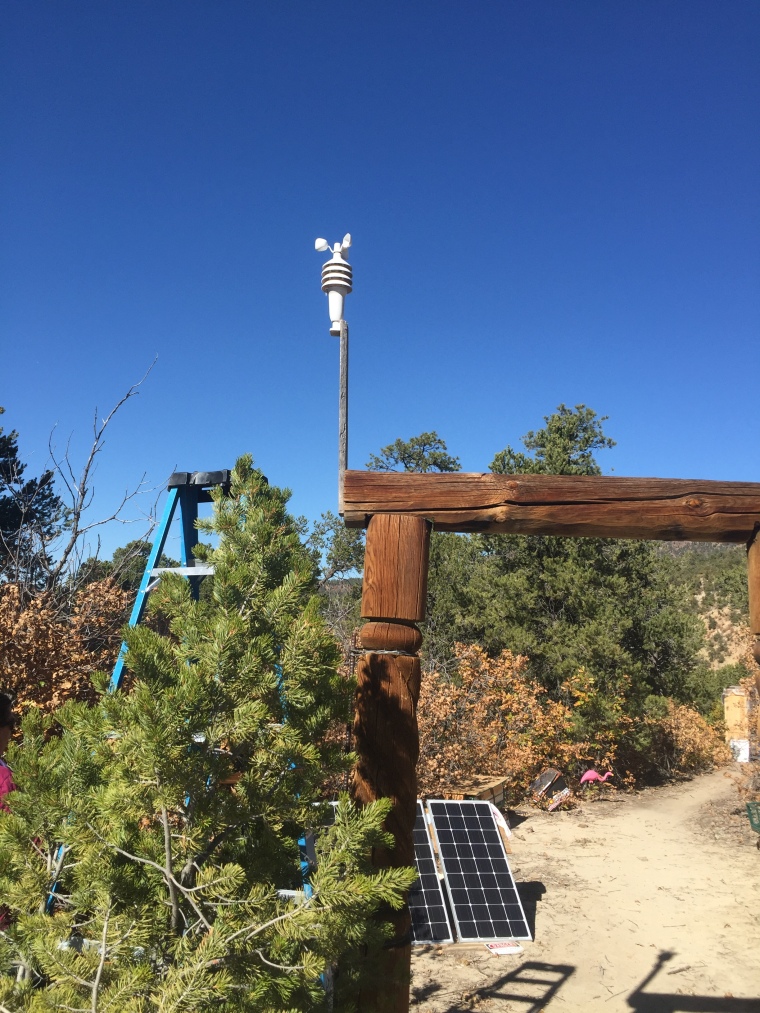
As we were wandering around the hardware store last summer we came across this AcuRite Weather Center (model 00615). We weren’t in the market for a weather station but it was on sale and as we walked the store getting the things we came for we convinced ourselves that we just couldn’t live off-grid without this particular weather station right now… Long story short we were the proud new owners of this piece of technology.
This is a 3 in 1 model, it measures; temperature/humidity (inside and out), wind speed and barometric pressure. The kit comes with a display unit and the 3 in 1 sensor that is mounted outside in a location of your choice. The display unit houses loads of good information as seen below and even has trending arrows for outside temp/humidity and pressure as well as a bottom scroller that you can adjust to flash the info that is most important to you.
Display Unit
The 3 in 1 sensor was very easy to install, and certainly seems like it would be easy to install in numerous locations. It is really the work horse as it wirelessly transmits all the data to the display unit inside. The instruction manual says to keep the display unit and sensor within 330 feet of each other and I think we are certainly at that limit and operating fine.
Mounted 3 in 1 Sensor
While this a great product overall and we are certainly happy we did make the decision to buy it. We have identified a few opportunities for improvement…
1. It has a “future forecast” feature in which it “predicts” near term weather using the trending temperatures and barometric pressure. We are doing better licking our finger and sticking it out the door to create our forecasts than this weather center does.
2. We think it needs a backlight on the Display Unit. It would probably be better if we didn’t know it was 45mph winds at 1:00 in the morning but dangit we still feel we should be able to if we want to.
3. You lose your historical data when you change the batteries in the Display Unit. Simple solution is to just write it down if you are interested in saving it, wish I would have thought about that before I changed the batteries. 🙂
It’s important to understand that we weren’t shopping for a weather station so we just got one on the spur of the moment… If we had been shopping for one, it’s pretty likely that we could have found one that would have solved problems 2 and 3 at least…These are very minor flaws for us, we definitely feel like we made the right decision on this purchase. While we may upgrade to a more robust weather station in the future we think this was a great start and was Worth the Cash!
As we were wandering around the hardware store last summer we came across this AcuRite Weather Center (model 00615). We weren’t in the market for a weather station but it was on sale and as we walked the store getting the things we came for we convinced ourselves that we just couldn’t live off-grid without this particular weather station right now… Long story short we were the proud new owners of this piece of technology.
This is a 3 in 1 model, it measures; temperature/humidity (inside and out), wind speed and barometric pressure. The kit comes with a display unit and the 3 in 1 sensor that is mounted outside in a location of your choice. The display unit houses loads of good information as seen below and even has trending arrows for outside temp/humidity and pressure as well as a bottom scroller that you can adjust to flash the info that is most important to you.
Display Unit
The 3 in 1 sensor was very easy to install, and certainly seems like it would be easy to install in numerous locations. It is really the work horse as it wirelessly transmits all the data to the display unit inside. The instruction manual says to keep the display unit and sensor within 330 feet of each other and I think we are certainly at that limit and operating fine.
3 in 1 Sensor
While this a great product overall and we are certainly happy we did make the decision to buy it. We have identified a few opportunities for improvement…
1. It has a “future forecast” feature in which it “predicts” near term weather using the trending temperatures and barometric pressure. We are doing better licking our finger and sticking it out the door to create our forecasts than this weather center does.
2. We think it needs a backlight on the Display Unit. It would probably be better if we didn’t know it was 45mph winds at 1:00 in the morning but dangit we still feel we should be able to if we want to.
3. You lose your historical data when you change the batteries in the Display Unit. Simple solution is to just write it down if you are interested in saving it, wish I would have thought about that before I changed the batteries. 🙂
It’s important to understand that we weren’t shopping for a weather station so we just got one on the spur of the moment… If we had been shopping for one, it’s pretty likely that we could have found one that would have solved problems 2 and 3 at least…These are very minor flaws for us, we definitely feel like we made the right decision on this purchase. While we may upgrade to a more robust weather station in the future we think this was a great start and was Worth the Cash!
We got very lucky and were gifted two attachments for our power tool batteries that turn them into multi-port USB Chargers. We will do a review-of our Makita tools in the near future, but for now I just want to tell you about our experience with this neat little attachment.
There’s not really much to say, the attachment slides right onto the battery. It has two USB ports so you can charge multiple devices at the same time. My favorite feature is the dust/dirt cover that seals the USB ports when not in use. I truly don’t understand why more items of this nature (cell phones, chargers etc..) don’t have this feature as fighting the Sahalee Mud Monster is a constant struggle!!
We have several other USB Chargers, that we will review down the road but this one is our go to source for our evening lighting and charging devices. Not only are we huge fans of something so simple as a dust cover but the cordless power tool batteries just charge so quick. This saves us from draining our solar power source or from running the generator, which we hate to do.
What’s that? You own Dewalt or Milwaukee tools or another brand that is not Makita? Don’t fret, Makita is not alone in having this handy attachment just follow this link and search your brand to get one for yourself!!
So, even though it wasn’t our cash– We absolutely believe this attachment is Worth the Cash!!
We got very lucky and were gifted two attachments for our power tool batteries that turn them into multi-port USB Chargers. We will do a review-of our Makita tools in the near future, but for now I just want to tell you about our experience with this neat little attachment.
There’s not really much to say, the attachment slides right onto the battery. It has two USB ports so you can charge multiple devices at the same time. My favorite feature is the dust/dirt cover that seals the USB ports when not in use. I truly don’t understand why more items of this nature (cell phones, chargers etc..) don’t have this feature as fighting the Sahalee Mud Monster is a constant struggle!!
We have several other USB Chargers, that we will review down the road but this one is our go to source for our evening lighting and charging devices. Not only are we huge fans of something so simple as a dust cover but the cordless power tool batteries just charge so quick. This saves us from draining our solar power source or from running the generator, which we hate to do.
What’s that? You own Dewalt or Milwaukee tools or another brand that is not Makita? Don’t fret, Makita is not alone in having this handy attachment just follow this link and search your brand to get one for yourself!!
So, even though it wasn’t our cash– We absolutely believe this attachment is Worth the Cash!
Ridiculous. That’s what I originally thought of the ‘pooch pouch‘ because I always had big dogs, and packing around little designer pocket dogs was just a little too ostentatious for this gal. But, here I am, the very proud and unbelievably happy owner of an 8-pound joyful pup we call Radar Love, whom we believe has never left the state of Florida.
Having dogs out West is a necessity, but the itty-bitty variety pose a bit of a challenge when we’re looking at spending a great deal of time outdoors working and playing amid miles of wild mountain terrain home to big boulders, tumbled timbers, clingy cactus, and snow. Dare we mention all the resident beasts.
I guess the pooch pouch elevated its status since it will help keep Lil Girl warm and safe as she adjusts to her new home.
I can’t really say when it was I first discovered Doug Fine, but his story has been a major motivator for this adventure over the years. If you’ve never heard of his book Farewell, My Subaru, I encourage you to become acquainted, and hope you find the same comfort I did in knowing that we all have the power to make our lives what we wish them to be with a little creativity – and a lot of hard work.
Enjoy this short video of the Organic Cowboy’s transition to rural off-grid New Mexico while still enjoying the creature comforts of big city life:


 Adding just a little bit of color to life…