
Completing the bathroom renovation at Casablanca to include some basic self-taught adobe repair was truly gratifying, but I knew there was a lot more to learn about finishing earthen walls (without special treatments for wet areas) since we have several more rooms to renovate. I decided to enroll in a proper adobe plastering class (online) and live owner-builder workshop with Adobe in Action at the end of September. Read on to see the pics and find out more about what I’m learning now!
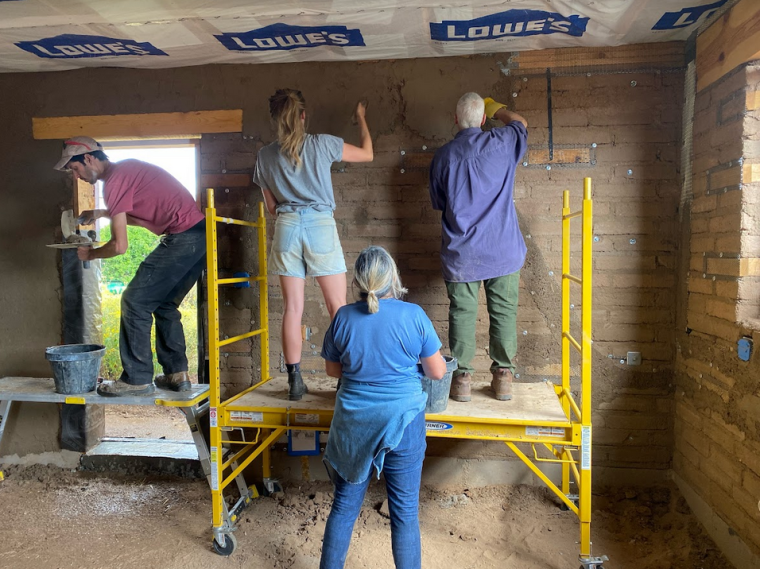
At the workshop site on day one, I first met owner-builder Paul and our instructor Issac. We were then joined by a handful of other adobe students to help Paul move his new construction project along with Issac showing us some valuable pro tips. With the exception of some late afternoon rain showers both days, the early autumn weather was just perfect for laying down some fresh-mixed mud on the interior walls.


I neglected to take pictures of the mud mixing space outside with the knee-high piles of fill dirt and washed concrete sand that Paul had delivered. There was a sifting screen set up and a couple of shovels, along with several 5-gallon buckets for water next to the hose. Issac showed us how to use the shovel to put the clay-dirt through the 1/4-inch screen and then how to make level measures of clay and sand to blend in the deep wheel-barrow before adding water. The ratios of clay to sand vary from site to site depending on where the materials come from. After the wet mud is mixed through, screened straw was added to give some reinforcement.


After Issac gave some time to demonstrate his practiced technique with some pointers on how to select and handle the tools with the mud, we were all turned loose to try our hands at the hawk and trowel. This skill of lifting mud from the hawk with the trowel is something that I have yet to master. While it is now the most conventional means of applying plaster to walls, I am still pretty well enamored and more graceful with the more traditional hand-thrown method of putting mud up. In fact, earthen plaster guru Carole Crews says that she has yet to see a woman using a hawk.

During day one’s introductory lap, some of us expressed our inclination to enter a meditative state while intently applying mud between the chatter. Watching the transformation before you that is a result of your hand moving organic materials across large surfaces is captivating and reflective. With each gooey glob going up, I found my mind wandered back to my little girl days making mud pies in my Southern Colorado back yard. It was easy to absorb the earthy smell and tune in to the sound of smoothing the rich brown concoction while connecting the ideas of soil and home to self.


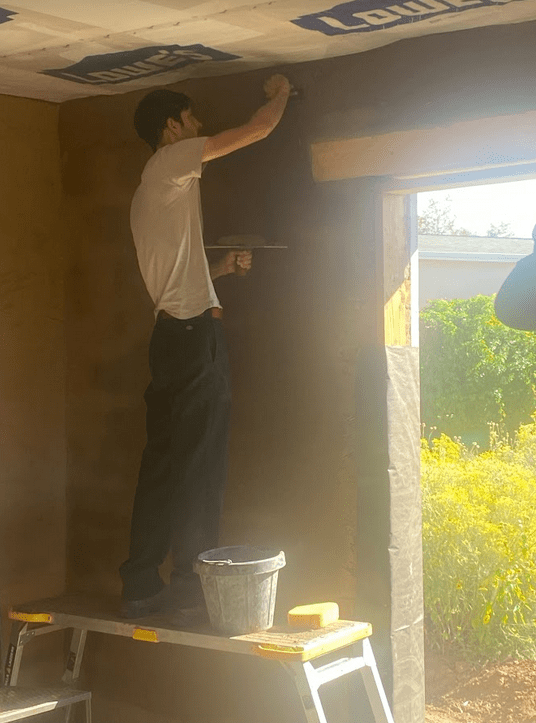
Day two had us moving on to more detail work and treatments for finishing. Being able to round out bullnose-style corners calls for next level artistry. Issac emphasized the benefit of being proficient with the hawk to lay in the plaster neatly to the corners while also showing how a simple plastic disc (cut from the lid of a Bueno red chile tub) could be used for the finer shaping after the mud dries a bit.

The most exciting part for me, by far, was seeing more about how to mix and apply colored finish coats. Since Paul’s place was not yet ready for that step, Issac mixed up some different samples and test adobes for us to note the new ingredients and finishes. Raw materials like silica sand, mica, kaolin, and ceramic pigments were mixed in different proportions with more finely-screened clay dirt and straw to create different effects. These constituent parts can be found at New Mexico Clay to experiment and trial custom treatments. The finer the grain, the smoother the finish (1/8 inch or better for clay/sand, 1/4 inch for straw).


Today’s recipe for white plaster:
- 3 part kaolin
- 1 part mica
- 1 part each of 30-, 60-, 90-mesh silica sand
Because I’m not going for any type of special color and looking to keep things simple white at Casablanca, I think I might resort to a premix instead of wrestling with multiple bags of ingredients. Premixed finish plasters from American Clay are more recent to the market and generally more expensive in large quantity. The spaces to plaster in our old house are smaller, so it could work out to be a wash.
To further enhance my learning at the hands-on workshop, I started the 3-credit online class with Kurt Gardella that same week. Plastering is just one part of the Adobe in Action Certificate curriculum. From the course syllabus:

The midterm for this class is to “make a small batch of wheat paste and prep a drywall patch panel for plaster leveling and finish coat.” Follow Sahalee Off Grid on Instagram to see how I do. You can also go there to see how I end up plastering the rest of the walls in Casablanca with all my new found knowledge. Thanks for reading and feel free to reach out with any questions!